
Super Quick Custom Themes for Windows Terminal
- Shannon

- Sep 23, 2022
- 4 min read
I recently went down a windy road to get my Windows Terminal customized. Let's take a few steps back and note that everyone should be using the Windows Terminal. If you're not, maybe take some time to use it after reading more about what it can do for you inside the Microsoft official documentation. I was reluctant to embrace the tool myself, but that recently changed. The biggest reason I find it invaluable is you can have a number of different profiles loaded up underneath 1 application. In my own terminal, I have the traditional DOS command prompt, PowerShell, Azure Cloud Shell, Ubuntu, Developer Command Prompt for VS 2022, and Developer PowerShell for VS 2022. I still have Visual Studio installed on my desktop, don't judge. I typically only use it now for weird nested ARM templates or ARM templates with a lot of DSC. Soon, I hope to have an interesting blog post to share that talks about how you can ditch Visual Studio entirely and code with Visual Studio Code for your ARM Templates or Bicep templates. Stay tuned...
So back to the Windows Terminal. You can make it look however you want it to look, which is cool. I've also come to the realization that I had all these tools in front of me earlier, but I didn't have time to absorb and/or properly understand. As a result, I thought a good blog post would help me out in the future (and maybe it even helps you!).
First thing's first: launch Windows Terminal and click on the downward arrow to bring about the settings prompt. Select settings.

Move down to the Defaults section and look at the pane to the right. Click on Appearance (I just picked default for now, but know that you can customize each individual profile you run, which is insanely awesome).

Under Text, you will see a text box on the far right with a drop down arrow. Click on the text box and corresponding arrow.

Note, Purple Rain is a customized theme. If you just downloaded Windows Terminal, you will see a similar window, but it will only contain Campbell, Campbell Powershell, One Half Dark, One Half Light, Solarized Dark, Solarized Light, Tango Dark, Tango Light, and Vintage. Take a peek at my screen shot below (note that Color Scheme 10 is another attempt at messing around with the colors and themes within my own Windows Terminal).

For the longest time, I just picked Solarized Dark and that worked. I do play around with PowerShell a lot and noticed that certain scripts I'd build or run would look awkward or be too dark, so I did what any tinkerer would do: I found some time on a Friday afternoon and fixed this in full for my machine.
After a bit of Googling, I stumbled across this site: TerminalSplash and wondered where it had been all this time. You see, there are definitely a lot of blogs out there that can show you how to manipulate the transparency, the font, etc., etc. If you're not careful, you can quickly go down a deep rabbit hole and I had to pull myself out of there multiple times before (which is why I was on Solarized Dark for so long). Now, if you're curious, know I am using the dark theme, I am using the Consolas font, and my background opacity is 83%. I am not using a background image, so maybe think of these as the super lean instructions to get you closer to where you'd like to be!
Back to TerminalSplash. Find a theme you like and don't be afraid to scroll. I'm going to pick Shades of Purple (I'm a fan of a purple terminal!). Click on code.

When the next screen pops up, click Copy.

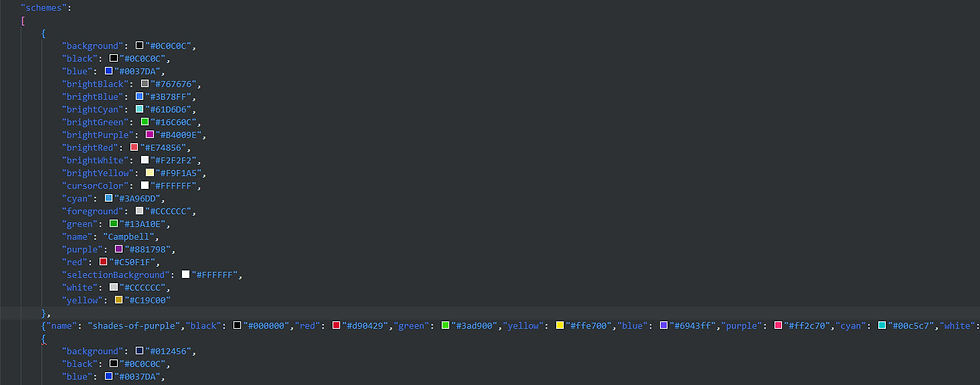
After you've copied the JSON formatting for that theme, go back to your Windows Terminal. Select Settings in the Windows Terminal like before, HOWEVER make sure you're also holding down Shift at the same exact time. This automagically opens the settings.json file in your default text editor (I'm using VS Code as my default). Note, it's hard to showcase how you accomplish this task with a screen shot. If you have problems with how I've outlined the instructions and/or can't seem to make this work, I encourage you to drop me a line. Once the settings.json file is loaded up in your default text editor, you will see JSON text like this:

Scroll down to the following section: schemes. As far as I know, it doesn't technically matter where you paste in the information you copied from TerminalSplash. Because JSON can get funky, I always paste anything new after the first set of brackets and after the comma. When you paste in the new information, it will paste in all funky.
After each comma, use a carriage return so the code you copied looks like other schemes. Then make sure there's a comma at the end of your scheme (life without a comma in JSON leads to many headaches):

Make sure you hit save on your open settings.json file before closing the file.
The best part? You don't actually need to close out of Windows Terminal. Flip back there and go into Settings again. If you move down to the Defaults and locate Color scheme to use the drop down again, you should see your new scheme: shades-of-purple.

Select that new scheme as your default profile and click on Save.

After you hit save, the default terminal will change! Huzzah!

The same procedure is done for each profile, but I stuck with the default to change it everywhere. Let's say you follow my instructions and your PowerShell core profile doesn't change. Chances are you've specified a profile color/scheme previously and you may need to go into that profile vs. the default profile.
I myself am actually experimenting with styles and flavors for each of my profiles and haven't landed on a direction as of yet. I was mostly excited to share TerminalSplash, showcase how easy it is to get something installed/configured, and get you functional vs. following the myriad of blogs out there that take you down a very windy road toward getting your Windows Terminal up + customized in 1 fell swoop!


Comments