
APIs Aren't Just For Devs Pt. 11 - Putting it all Together!
- Shannon

- Apr 7, 2024
- 9 min read
Ok - I'm here to loudly proclaim that my entire "APIs Aren't Just for Devs" series is drawing to a close. I'm hopeful you've found these posts insightful or at the very least helpful. Apologies for this last post taking almost 7 months to compose. As you'll find, this post is the TLDR post (my apologies).
As a reminder, I wrote this series as a direct result of delivering a similar session to a vBrown Bag user group meeting in 2022. If this is the post you're viewing, here are the other posts in this series:
APIs Aren't Just For Devs Pt. 9 - To REST API or Use GraphQL, That is the Question... (shankuehn.io)
If you've read through everything, you now know I've gone through theoretical representations on how the request and response would look like to understand these API concepts deeper, however who doesn't love a good few demos to help it solidify everything you've learned? If you thought "no one", I think you're right!
Onward to the demos!
To start, I use a tool called Postman. What is Postman? Postman is a popular software tool used for testing, documenting, and managing application programming interfaces (APIs). It provides a user-friendly interface for sending HTTP requests to APIs, collecting responses, and automating API testing and monitoring. Postman is widely used by developers and teams (and now ops teams - yay!) to streamline API development and ensure their APIs work as intended. I've personally found it's a great tool and lightweight if you want to have the application live locally on your machine (Download Postman | Get Started for Free). If not, there's even a web console you can use as well: Postman API Platform.
Postman has quite a bit of free APIs to get you comfortable with the request and response flow process: Public API Network | 10,000s of APIs, Collections and Workspaces | Postman. Each API listed there has corresponding documentation to comb through if you want to start digging in deeper after this series.
For purposes of this blog, I'll focus on 3 specific use cases: 1. Standard API request/response
2. API request/response using parameters
3. API request/response using authentication/authorization
Standard API request/response
Often times, you need your public IP address for building things (especially in the cloud and especially if you're dealing with networking). The problem is your ISP could change that public IP if you get a new modem or sometimes at random (looking at you, Xfinity). You might also be a frequent traveler, so you don't always know your public IP as you connect to various different WiFi networks throughout your travels.
What if I told you there's an API you can query and find your public IP address? It's sort of nifty and cool in its own right as well! Without further ado, here's ipify - A Simple Public IP Address API. Now, on the website, you'll see all sorts of references to "cURL". If you're unfamiliar with cURL, just know it is a versatile command-line tool that can be used for various API interactions, including GET requests (but it's not solely limited to GET requests). The tool can do much more than just fetching data.
So how do you use Postman to form the request and receive the response? Let's take a look at it all loaded up in the web client:

The public API doesn't require too much to get your IP address listed. Specify that the request will be a "GET" request, input https://api.ipify.org, and click on "Send."
You will see a response that looks like this:

In the response body, you see my public IP address, my status message as 200 OK, the size of the request, and the amount of time it took to receive the response. You can take this 1 step further and request that the format come back in JSON, which will help you programmatically build out cloud resources in an automated fashion:

Notice how I am now passing a key/value pair of "format" and "json" in my request. My response now comes back in JSON. Pretty cool, aye? Maybe also something you might want to tinker around with in the future. Note, cURL does do the same thing as well, so if you are at the command line and don't want to mess with a GET request, that's another option for you.
API Request/Response with Parameters
As you may recall, the parameters give you more precise information from APIs. These days, you can easily search the internet for song lyrics. As a kid growing up, you could not simply search for that information and often times misheard lyrics. I always misheard Whitesnake's "Here I Go Again On My Own." To me, I heard "Like a twister, I was born to walk alone." That never sounded right at the time, but I never searched for those lyrics until much later in life. Let's use that as our example and find out the right lyrics! There's a great free public API to use for this example request/response using parameters. Take a peek at this site: ChartLyrics API. What's cool about this is the API doesn't require a token and is actually a SOAP API endpoint! I can showcase the request process (which looks very similar to a REST API) and what you receive as a SOAP response. Pretty nifty, aye? Let's get into it!
Postman LIVE is a public workspace, which contains sample collections and projects from weekly and monthly livestreams. I have spent quite a lot of time here searching for public APIs to hit. As you feel yourself becoming more and more comfortable with code, bookmark it for the future! The ChartLyrics API has a prepopulated request, so you know how to precisely hit the API. Note, you could fish around on the site above, but sometimes it's faster/easier (especially as you're learning) to go to one of these prepopulated requests:
One thing to mention is if you want to play around with these API collections yourself, you will need to create a fork. If you hover over send, you'll see a dialogue box like this:

After you create the fork, you can now input data into the request and receive responses. Take a look at how I prepopulated the request with Whitesnake's "Here I Go Again On My Own":

After I hit send, take note of how the response shows up (and also notice how it's XML - don't forget my post on SOAP APIs: APIs Aren't Just For Devs Pt. 8 - SOAP vs. REST):

You should see a Status of 200 OK at the top right (don't forget my blog post on HTTP response codes: APIs Aren't Just For Devs Pt. 5 - HTTP Response Codes). You should also see that it's "drifter", NOT "twister". Silly Shannon!
API request/response using authentication/authorization
Even though I'm dabbling more and more into the realm of multi-cloud, I still am vastly deeper in Azure. For this example, I'm going to set up an application registration, complete with a Service Principal, and then I'll populate it with a secret. This showcases authentication/authorization in the context of an API request using Postman.
First off, head to the new Entra portal by browsing here: https://entra.microsoft.com. After the portal loads, you should see Applications on the left menu. Click the downward facing triangle and then click on App registrations:

When the next page loads, click on +New registration at the top of the page that loads once you click on App registrations.

Let's call this public-auth-api-example and make sure it's only available in my tenant. Click Register at the bottom of the page.

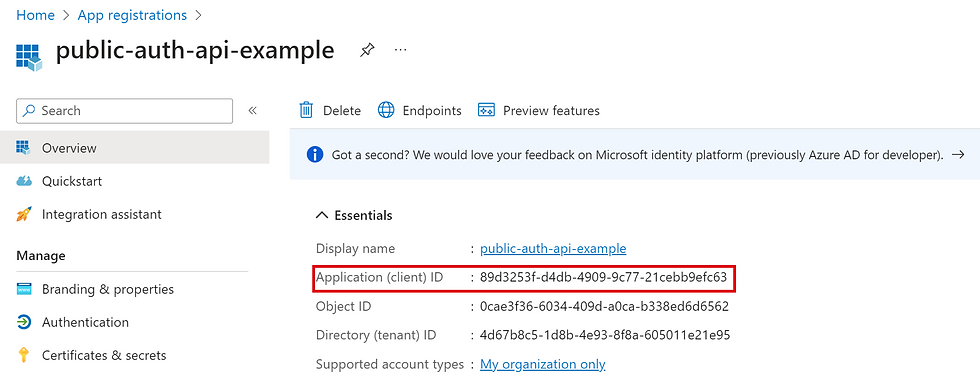
After the application registers, copy the Application ID (or Client) so we can make the API request in postman:
Next, click on Endpoints and we need to grab a few URLs from the pane that pops out. Copy both the OAuth 2.0 authorization endpoint (v2) and the OAuth 2.0 token endpoint (v2) URL:


So, for my example, the App ID is 89d3253f-d4db-4909-9c77-21cebb9efc63, the OAuth 2.0 authorization endpoint (v2) is https://login.microsoftonline.com/4d67b8c5-1d8b-4e93-8f8a-605011e21e95/oauth2/v2.0/authorize and the token endpoint is https://login.microsoftonline.com/4d67b8c5-1d8b-4e93-8f8a-605011e21e95/oauth2/v2.0/token.
Let's go back into the application again and register a secret. Click on +New client secret:

Fill out the description and expiration date:

You will be provided with the Secret Value one time only in the next page. Be sure to copy that out and place it in Key Vault if you're configuring this for production. For purposes of my demo and blog, I'm not going to do that to finish up this series, but I WILL delete the secret after I publish the blog. ;)

Before we head back to Postman, let's add one more thing in the mix so the request succeeds. Let's go into Authentication and add a platform:

We need to add a redirect URI to the call so it is successful and we receive a token from the OAuth request. Select Web in Configure platforms:

For the Redirect URI, use the following Postman redirect, since we'll be testing from Postman: https://oauth.pstmn.io/v1/browser-callback. Once that's in place, click on Configure:

Great, now everything is configured for the REST API call using OAuth 2.0 in Postman!
Head back to Postman and create a new collection by clicking on the + button at the top. As you hover over the +, you should see Create new collection pop up as well.

Create a Blank collection when the drop down appears:

Click on the ellipses next to New Collection and select Rename from the drop down. Title it something like REST call experiments.

After you've renamed the collection, click on the ellipses to the next of REST experiments again and select Add request:

Name the request something like oauth2.0-token (as we're after the token). Once you've renamed it at the top, click on Authorization. From there, make sure you switch the Type to OAuth 2.0:

Let's start filling in the relevant details. Plug the authorize endpoint in the Auth URL (my example is https://login.microsoftonline.com/4d67b8c5-1d8b-4e93-8f8a-605011e21e95/oauth2/v2.0/authorize). Paste in the Access Token (my example is https://login.microsoftonline.com/4d67b8c5-1d8b-4e93-8f8a-605011e21e95/oauth2/v2.0/token). Paste in the Client ID (my example is 89d3253f-d4db-4909-9c77-21cebb9efc63) and secret (I won't paste this in here for obvious reasons). For the Scope, put in user.read (note, you can read more about scopes here). Don't worry about any of the Advanced configurations.
At the end of this exercise, your request should look like this:

Scroll down on that page and look for Get New Access Token. Click that button:

This entire call will authenticate via the web. You will be taken to a prompt that looks like this the first time you make this call. Click Accept:

Note you do not need to place a check mark next to Consent on behalf of your organization to complete this demo. I won't cover that in this post, but if you're curious to read more, here's the link to dig deeper.
The request should then successfully authenticate, and you should see a similar looking screen:

From there, Postman will take you to the following screen, which will show you the Bearer Token you can use for the request. Click on Use Token:

When you scroll back up to the top of Postman, you'll see the Bearer token populated in the field for use:

Now that the token is being stored in Postman, let's make an API call using that token! Microsoft Graph is "a protected web API for accessing data in Microsoft cloud services like Microsoft Entra ID and Microsoft 365". So, let's hit the Microsoft Graph endpoint and query information about the user account I'm accessing to complete this demo.
One big thing to remember: I'm not using my user identity to query this data, rather I'm using a token I received from calling the application registration's secret inside of Entra ID. Populate the API request field in Postman accordingly, leave it on GET, and click Send:

Inside the console below, you should see a similar pane display. Take note of the JSON response and the corresponding status:

Now with that, we've come so far, but only scratched the surface. Hopefully you feel a little more confident on what APIs are, the different responses, the history, REST vs. SOAP, why REST is so commonly used, the different ways to hit APIs, etc. I'm going to put a bookmark in this series for now, but expect some more noodling and demystification down the road, because I'm continually deep diving down into the world of development. I think I can lend some helpful hands to those of you that are now hanging out in this software defined universe but are maybe struggling with some of the concepts.
Thanks for reading and let me know if you have any ideas for future blog posts!


Comments